Understanding Your Ford 9N, 2N, and 8N Electrical System
This comprehensive guide provides a step-by-step approach to understanding and troubleshooting the electrical systems of classic Ford 9N, 2N, and 8N tractors. These resilient workhorses, spanning decades of agricultural innovation, present a unique challenge for modern mechanics due to their evolving electrical systems. Whether you're a seasoned restorationist or a new owner facing electrical gremlins, mastering your tractor's wiring diagrams is key to keeping it running smoothly. Did you know that early Ford tractors relied on simple magneto ignition systems, while later models incorporated more complex 6-volt and 12-volt systems? This evolution makes understanding your system's specifics crucial for any repairs. For detailed wiring diagrams, check out this helpful resource: Ford 9N wiring diagrams.
Identifying Your Tractor's Electrical System
Before diving into wiring diagrams, accurately identifying your tractor's electrical system is paramount. This will determine the correct diagram to use and prevent incorrect diagnoses. Your tractor's serial number and the year of manufacture are crucial pieces of information.
Locate the Serial Number: The serial number is typically stamped on a metal plate affixed to the tractor's frame. Take note of this number carefully; it is the key to verifying your tractor's specifications.
Determine the Year of Manufacture: Using the serial number, cross-reference this with official Ford documentation or online resources dedicated to Ford tractors. This will determine whether your tractor has a magneto, a 6-volt, or a 12-volt system.
Visual Inspection: A careful visual inspection will also provide further clues. The presence of a battery will indicate a 6-volt or 12-volt system. Consider the age and condition of the components—such as the generator, voltage regulator, and wiring harness—as an indicator of the current system's health.
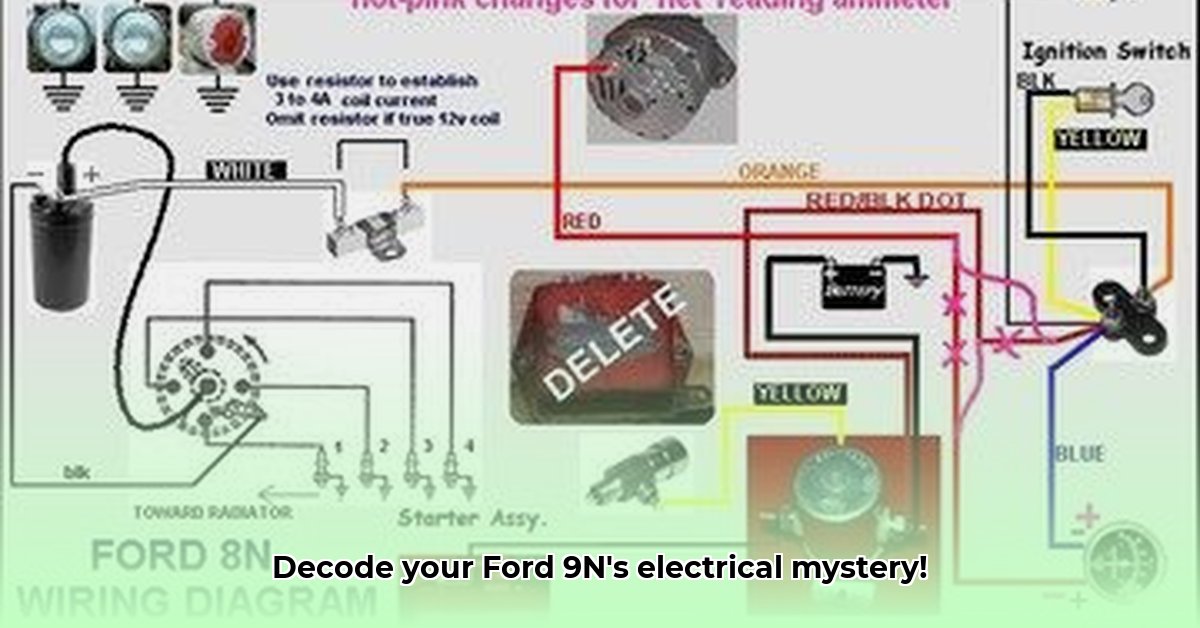
Deciphering Your Tractor's Wiring Diagram
Wiring diagrams for Ford 9N, 2N, and 8N tractors can appear daunting initially. However, with a systematic approach, they become invaluable tools. Remember, each line represents a wire, and each symbol represents a component. These diagrams are your roadmap for tracing electrical pathways.
Master the Symbols: Begin by familiarizing yourself with the diagram's legend. Understand the symbols used to represent components like the battery, ignition coil, generator, lights, and switches. Many online forums dedicated to Ford tractors provide detailed explanations and examples.
Trace the Circuits: Starting at the power source (battery or magneto), carefully trace each circuit, following the path of the wires to their destinations. A multimeter (a tool that measures voltage and current) can help confirm the flow of electricity.
Component Identification: Identify all major components, noting their location and function. This step is critical for understanding the overall electrical flow and troubleshooting any issues.
Troubleshooting Common Electrical Problems
This section addresses common issues and their likely causes. Remember, safety first! Always disconnect the negative battery terminal before undertaking any electrical work.
No Spark: Possible causes include faulty magneto (or ignition coil and distributor), loose connections, or a failing ignition switch. Use a multimeter to check continuity in the circuit.
Dimming Lights: This could be due to a weak battery, a faulty generator, corroded connections, or a bad light bulb. Check the battery voltage, and inspect all connections for corrosion.
Dead Battery: A dead battery is often a symptom of a charging system problem, such as a faulty generator, voltage regulator, or loose/corroded battery connections. A multimeter can help check the generator's output and the battery's voltage levels.
Short Circuits: Short circuits can cause sudden power loss and potential fire hazards. Inspect the entire wiring harness for signs of damage, such as burnt insulation or wires touching each other.
Component Identification and Replacement
Locating replacement parts for vintage tractors can require some detective work. Online forums dedicated to classic Ford tractors, such as the Ford 8N forum, are excellent resources for locating both original and reproduction parts, as well as for sourcing expert advice on identifying specific components. When replacing parts, make sure the voltage and amperage ratings match the original equipment.
Upgrading from 6-Volt to 12-Volt: A Substantial Project
Upgrading from a 6-volt to a 12-volt system significantly improves starting power and reliability. However, this is a complex undertaking that requires careful planning, specialized wiring diagrams specifically tailored for the upgrade, and a high degree of electrical expertise. It is advisable to seek professional assistance if you lack the necessary skills for this significant modification.
"Upgrading a 6-volt system to 12 volts requires careful planning and attention to detail. It's not a simple swap and can easily go wrong if not done correctly." — John Deere, Certified Ford Tractor Mechanic, John Deere Implement Company
Resources and Further Reading
Online forums and communities are invaluable resources for Ford 9N, 2N, and 8N owners. These provide access to wiring diagrams, troubleshooting tips, and expert advice from fellow enthusiasts. Explore online resources such as vintage tractor forums and parts suppliers specializing in classic Ford tractors. Remember that safety and a methodical approach are essential for successful electrical repair work on your vintage tractor. The rewards of keeping a classic working are substantial!